alpine-wiki
Alpine Install: from a USB to any computer customized partitioning
Overall description: Alpine Installation from a official iso, dumpet to a usb source device media, and installed to a bare metal computer no matter if include UEFI this will guide to installed to boot, but using customized partiton layout
Means you will install Alpine in customized layout paritiont on PC computer from USB media.
Warning This method only works for most modern pc beyond 2016 and recents.
Feels lost here? check How to use this guide section of this document
Requirements
- A usb stick to write the ISO source media file downloaded
- In the new machine we need an USB port free and able to boot
- In the new machine we need support for booting from USB devices
- In the new machine we need at least 512Mb of RAM, but required 2Gb of RAM for desktop/graphical applications
- In the new machine we need target media with at least 2G of hard disk, but required 10G for desktops
- Will need to previously downloaded and burned the Source media ISO file from https://alpinelinux.org/downloads/ into USB or CD/DVD
Downloading the source medium to install
In this case, your PC wil have UEFI or must be beyond 2016’s you will need 64-bit iso then, the download URL will be:
http://dl-cdn.alpinelinux.org/alpine/v3.20/releases/x86_64/alpine-extended-3.20.0-x86_64.iso
How to download usin Graphical browser: point the web browser to that url and the download of the iso file will start. A file with .iso extension type, will be downloaded commonly into the Download directory.
How to download usin Command line method: in unix-like terminal (MAC/Linux) execute:
cd $HOME;wget -c -t8 --no-check-certificate http://dl-cdn.alpinelinux.org/alpine/v3.20/releases/x86_64/alpine-extended-3.20.0-x86_64.iso,
and unless the case of GUI, your .iso file wil be direclty in your home directory.
Writing the source medium to your USB
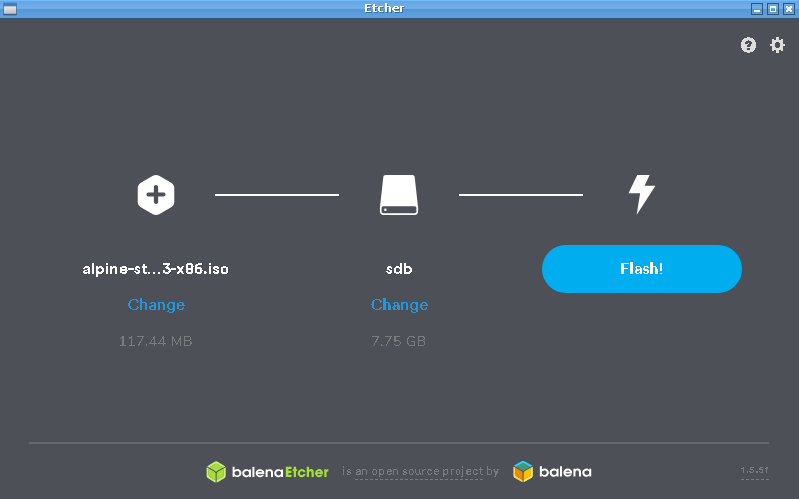
Using balena-etcher-electron to flash the USB drive from any system, its easy, simple and available for all OSs.
*Warning this guide assume only one hard drive as
/dev/sdaand only one USB as/dev/sdb
- download the
program balena-etcher-electron(there are portable versions) - Run the program
balena-etcher-electronas root in the graphical session - Click “select image” icon, open the downloaded image file
- Plug the USB drive into the computer, it will automatically show as
sdb - After it balena-etcher-electronshows the USB as “sdb”, clickflash
- Wait a while and when finished, close the program
- Take out the USB and place it on the installation target computer in a port
Note this method only works on recent MacOs 10.12+ or recent Linux 4.9+ installations

You can also made it manually, open your terminal program, move to the place
directory where ISO downloaded are placed and cp to the USB device:
umount /dev/sdb; cp alpine-extended-3.20.0-x86_64.iso /dev/sdb
Booting the Alpine ISO disc
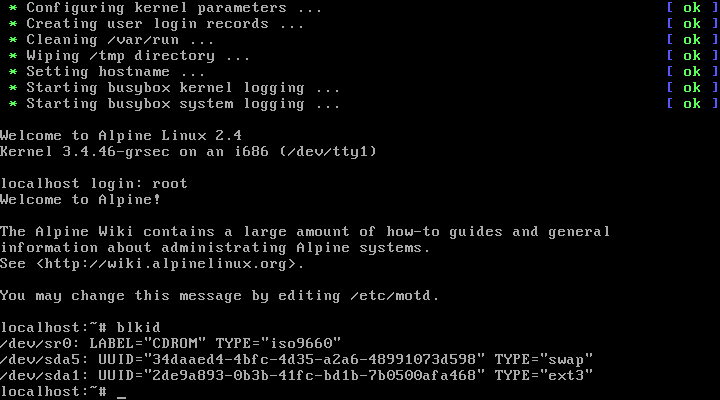
When the machine start, you must be sure to choose the right booting drive (commonly named USB boot drive or USB hard disk), so the disc/iso will boot and after a while a command line shell will show you:
Note When starting Alpine it will ask for the login, just typing root and pressing enter allows you to start:

Warning Tip: If your system is not configured to boot from a USB drive, it must be configured in the BIOS/UEFI, ask/search to your vendor or technical support, Toshiba computers need to hit F1 to choose boot medium, DELL must hit F11 to choose medium for example, and so and so
Installing after boot up
Warning if you do not download the extended ISO it may require internet.!!!
runing the setup script
After entering the root environment and gets the console prompt installation media, you must perform these commands, that will be in following order:
- prepare disk sizes, here we used boot partition up to 500 megs
- perpare swap sices, here we used swap partition up to 8 Gigs
- setup boot loader to grup (if wants lilo just change to lilo)
- and run “setup script” to configure and process instalation:
export BOOT_SIZE=500

export SWAP_SIZE=8164

export BOOTLOADER=grub

setup-alpine
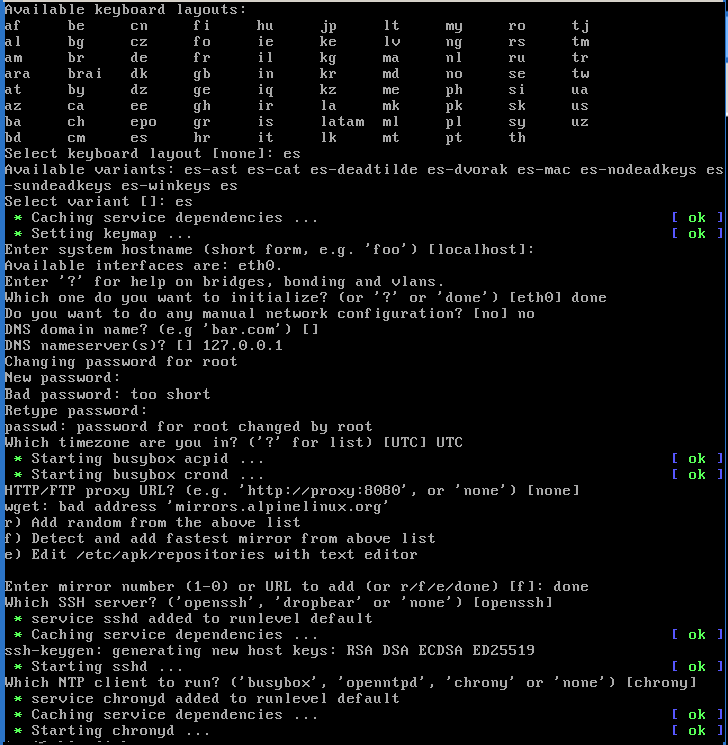
After last command, it will start some questions, these are in the following order:
- keyboard and variant, example for Latin is
esand after thenes-winkeys - hostname: just hit enter, it’s the name of the computer, must be only strings.
- Network: select the
eth0one that is the network cable and answerdhcp.- Network (again): only happends if you have wifi or second card.. must ignore it
- DNS Options: It is recommended to use
8.8.8.8andnonefor the domain
- Root: password for the administrative account, take care and dont forgive it
- Timezone: use UTC only for one OS, otherwise
America/Panamaor something similar - Proxy Options: Use
noneif you are connecting directly to the Internet. - NTP Options: Use
chronythe packet already in the medium (extended). - APK mirror: if you are over slow or no interent, type
Skipornone- User: modern alpine releases allows user creation, skip by typing
no - WARNING edit
/etc/apk/respositoriesand enable community ones!
- User: modern alpine releases allows user creation, skip by typing
- SSH Options: Use
opensshthe package that already comes in the medium (extended).- Root allow: here you must type
yesbecause we do not setup user yet! - SSH key: just type here
none
- Root allow: here you must type
- Disk Options: Use
nonecos we will use custom disk layout partition setup.- Config store: here just type
nonecos we don not need this in future - APK cache: just use default we will use extended iso or dont care
- Config store: here just type

Format Patitions and disk layout
We are configuring a UEFI capable system so we need to setup a minimal layout of three or more partionts, following are the mandatory ones:
| Mount point | Partition | Partition type Purpose | Minimum size | Formats |
|---|---|---|---|---|
| /boot/efi ? | /dev/ |
GPT UEFI Boot partition | 260 MiB | eufat |
| none | /dev/ |
Linux swap memory | 2Gb | swap |
| / | /dev/ |
Alpine Linux root system OS | 32 GiB | btreefs,ext2/3/4,xfs |
For more info about check ../alpine/requirementes.md and the document ../alpine/alpine-boot-uefi-bios.md.
Warning edit
/etc/apk/respositoriesand enable community repositories!
Here we will assume you already partitioned the disk, if not this part will
be only a quick steps using fdisk and assuming your ssd/hdd is /dev/sda so
then using same medium running alpine linux you can use fdisk:
fdisk /dev/sda; warning will erase entire disk!- hit
dand then enter how many times need until said:no partition is defined.. - hit
n+enter and then hit1+enter, and then enter to use default first sector - next for last sector of partiton write
+500Mand hit enter - if previously have partitions will ask for removal of signature, hit
Y+enter - now second partiton: hit
n+enter and then hit2+enter and use first default - for last sector of second partition write
+16G(or at least 4G) and enter - if previously have partitions will ask for removal of signature, hit
Y+enter - now thirth partiton: hit
n+enter and then hit3+enter and use first default - for last sector of second partition write
+160G(or at least 80G) and enter - if previously have partitions will ask for removal of signature, hit
Y+enter - now hit
t+enter and then hit1+enter and then hit1+enter - now hit
t+enter and then hit2+enter and then hit19+enter - now hit
t+enter and then hit3+enter and then hit20+enter - now hit
wand you will have 3 partitons, first: EFI, second: SWAP and root
After answering sys to the questions about the drive, and since there will only
be one drive, answering sda (if options shows to you) on which drive to use,
this will create and leave your hard drive as follows:
/dev/sda1as BOOT in 500Mb in/boot/dev/sda2as SWAP in 16Gb (or at least 4 gigs)/dev/sda3as ROOT in 160Gb in/(approximately or rest of space available)
So now we must format partitions so lest run those commands from alpine running medium, be carefully that you must enabled the community repositories previously:
apk add e2fsprogs dosfstools

mkfs.vfat -n EFI /dev/sda1

mkswap -L SWAP /dev/sda2

mkfs.ext4 -b 1024 -m 1 -L ROOT /dev/sda3
Setup and install to customized partition layout disk
This part will assume the following layout to property work, mounted in the following order as mandatory:
/dev/sda3as ROOT on/targetwith format EXT4 and 1024 sector size/dev/sda1as BOOT in/target/bootwith format of EFIFAT/dev/sda2as SWAP with a previous format
So then lest install customized partioned disk with alpine:
Warning edit
/etc/apk/respositoriesand enable community repositories!
apk add grub-efi arch-install-scripts coreutils os-prober

mkdir -p /target

mount -t ext4 /dev/sda3 /target

mkdir -p /target/boot

mount -t vfat /dev/sda1 /target/boot

mkdir -p /target/boot/efi

export BOOTLOADER=grub

export KERNELOPTS=" acpi_enforce_resources=lax iomem=relaxed vsyscall=emulated "

setup-disk -m sys /target

apk del syslinux

apk add grub grub-bios

grub-install --compress=no --boot-directory=/target/boot /dev/sda

cat > /target/etc/default/grub << EOF
GRUB_DISTRIBUTOR="Alpine"
GRUB_CMDLINE_LINUX_DEFAULT="rootfstype=ext4 modules=sd-mod,usb-storage,ext4 $KERNELOPTS"
GRUB_TIMEOUT=6
GRUB_DISABLE_SUBMENU=y
EOF
cp -f /target/etc/default/grub /etc/default/grub

mount /dev/ /target/dev/--bind

mount /proc/ /target/proc/--bind

chroot /target

grub-mkconfig -o /boot/grub/grub.cfg

exit

umount /target/proc

umount /target/dev

umount /target/boot

umount /target

reboot
NOTES: offline mode
If you cannot setup a internet connection you cannot install Alpine linux, unless you used 64bit intel/amd and “extended” iso install media. Most of the packages need to setup this procedure are not included in standard images, specially those for ARM devices like RasberryPi ones becouse WIFi setup.
Finishing the installation
After all of the scripts in the setup end, the “reboot” message will not happens and just type “reboot” and press enter, remove the boot media and newly installed system will be booted.
You cannot see a graphical window system? take it easy and get calmed down.. in Alpine all are made by the right way.. so if user need a desktop.. user can install a desktop
The wifi setup after install
Please follow the guide alpine-tutorial-wifi-routering.md, you will need to download the needed packages manually from another device and then but it on the installed Alpine computer using USBstorage external device.
Recommendations
- If you setup SSD disk.. you must tune up to downwrite or reduce writting process
- Next to graphical setup can be done using our tutorials (check the “See also” section at the end)
How to use this guide
This guide is for install process, many parts will need you understand minimal knowledge of linux.
This guide assumed you have a serial port allowed in the targeted computer, also its important you shuold understand the way of the configuration in this guide.
Warning Some Linux or/and Mac terminals have security cut/paste locks, so if you paste, the first line will be preceded by garbage, check always the first char of your paste.
Each portion of monospaced text means you must run it on the console, those lines junted can be performed and paste as one command, separate lines canont be run in bach mode.. so eacho separate line must be run alonside and wait output!
Licensing clarifications
CC BY-NC-SA: the project allows reusers to distribute, remix, adapt, and build upon the material in any medium or format for noncommercial purposes only, and only so long as attribution is given to the creators involved. If you remix, adapt, or build upon the material, you must license the modified material under identical terms, includes the following elements:
- BY Credit must be given to the creator of each content respectivelly, starting at the first contributor.
- NC Only noncommercial uses of the work are permitted, with exceptions if you fill an issue here!
- SA Adaptations must be shared under the same terms, you must obey this terms and do not change it.
https://codeberg.org/alpine/alpine-wiki/src/branch/main#license